In my quest to learn everything there is to know about the art of charcuterie (an impossible task, I know, but this is after all, a voyage of mystery & discovery, not a race to finish at some well defined ending), I’m constantly reading different guides and recipes and books and articles.
One of the ones that I keep going back to, reading & re-reading it constantly, is “Curing & Smoking” by Steve Lamb, of River Cottage fame. It’s detailed, passionate, fun, informative and pretty much a (secular) bible for people interested in the craft and history of charcuterie.
So, the chance to spend a day learning at the feet of the master, with Steve at River Cottage HQ in Dorset came up and I jumped at the opportunity.
After a bone-shaking trip down to the farm in the back of a tractor-drawn trailer (the normal short meadow walk being blocked by a large bull), the day started with a small but gorgeous snack of “face bacon*” & maple syrup, on small Scots pancakes along with a glass of Kingston Black apple brandy.
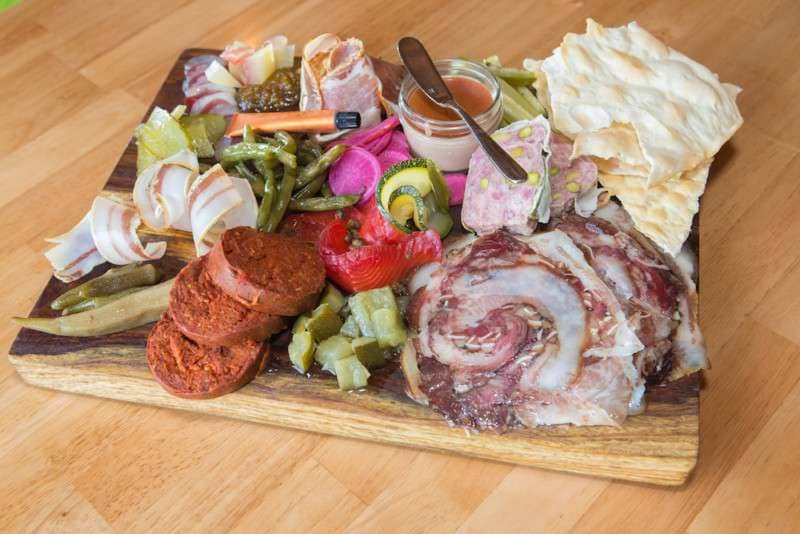
(This image isn’t from River Cottage by the way, but it’s explained below)
* And what is “face bacon, I hear you ask? Here’s a great description from Chef Phillip Lopez, of Root in New Orleans (a restaurant that wasn’t there when we were working in the Crescent City, but reason enough on its own to go back. I’m going to ask if he’d let me apprentice with him):
I gotta say the face bacon. By far, it’s my favorite. It was a crazy idea I had before coming to Root, and I started experimenting with the face. I spent a long time defining this technique. And we utilize the the face bacon in different ways. Of course, it’s on the board, but when we were serving marrow bones, we would make a face bacon jam to go with it. And we always have scraps leftover from slicing, so I asked the bartender for ideas. We came up with this – well, we would render the fat from the face bacon and add it to Bulleit bourbon and sous vide it for 24 hours. Then we’d freeze it, so the fat could be easily separated. Take the fat off, and we have face bacon bourbon! Voila, face bacon manhattan. It’s a little smokey and it’s pretty freaking awesome. The demand for it is so high that we’re making like five bottles of it a week.
And so to work…
A delightful piece of meat, half of a 9 month old, rare breed Oxford Sandy & Black (I’ll be writing up a history of this great breed shortly, for the History pages) is what we all soon started working on. Remember that commercial breeds go to be butchered at only five months. Madness.
Bred on their farm, slaughtered close by a day or so earlier, this couldn’t have been more local or fresher. A lovely piece of meat, with great fat depth & even marbling (as we were to find out) although not quite at the Wagyu beef level but then this is a pig after all, not a cow that’s been raised for close to 36 months before being slaughtered. Anyway, enough, I’ll be doing a piece on Wagyu beef elsewhere at some point.
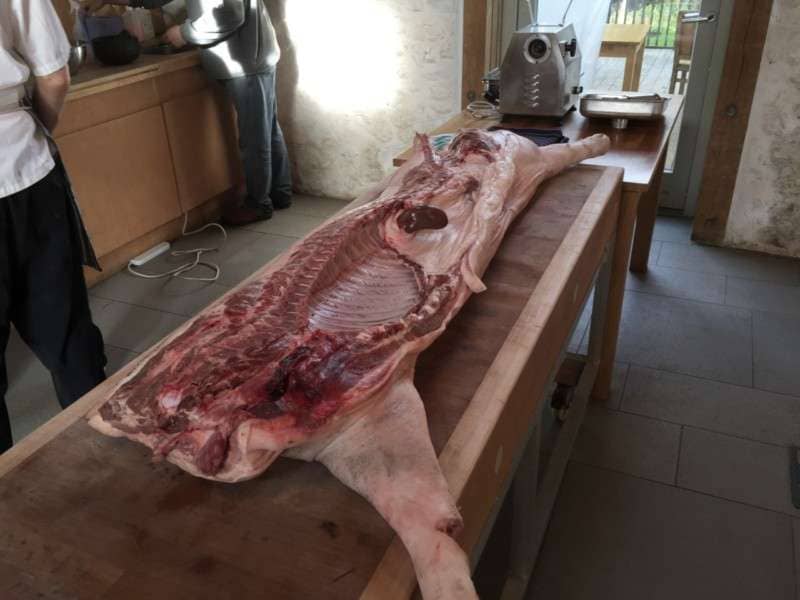
In the background, you’ll see (a) Steve in whites and (b) the meat grinder. The former started work straight away, the latter only came into play an hour or so later. With only half a dozen other people there, it made for a great atmosphere and gave everyone the chance to practice their knife & butchery skills when it came to breaking down the carcase.
Nothing was going to be wasted – “respect the animal” in action.
So with some cursing (certainly on my part when I was asked to remove the skin from a huge side) and much furious knife wielding & regular sharpening by everyone, the carcass was broken down, cut by cut, under Steve’s guidance.
Remembering that “nothing wasn’t to be used”, meant that whilst none of us could claim to have reached Master Butcher standards at any point, that wasn’t important. What was important was that we learnt what the cuts & muscles were and that every piece of meat & bone was to be utilised, either by us in the charcuterie or by the chefs for stock & sausages.
I’ve no ‘photos of the resultant pieces, sorry, far too busy listening to Steve describe what we’d be doing with them later.
We ate everything that we worked on — thank the deity that I’m not doing this course every day or I’d be the size of the side of a house within a week.
This rather attractive grouping of salami was produced by everyone. The first one was actually produced by me, although how you’d know, I’ve no idea.
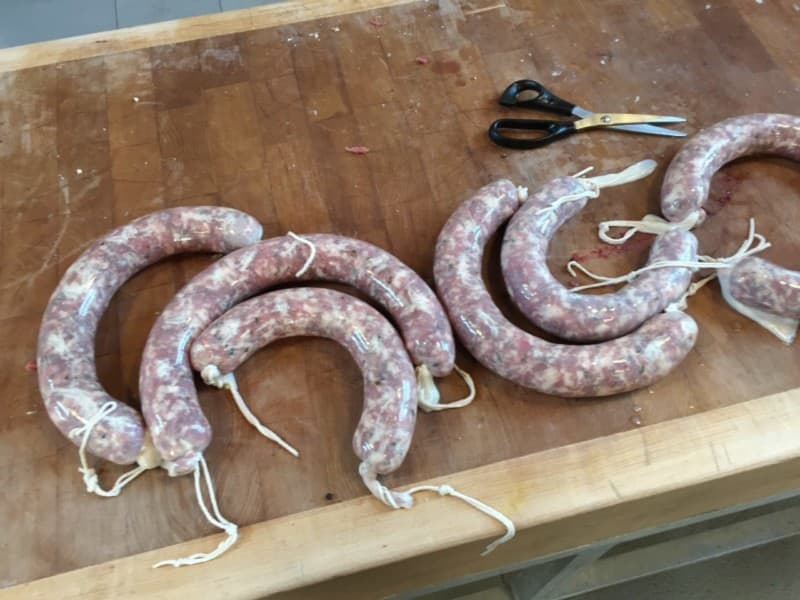
And here, courtesy of Steve & River Cottage, is how we went about the first part of this process:
To get the right texture, it’s very important that the back fat is diced extremely finely. It does take time, but it’s worth it. It’s a good idea to freeze the fat first, which makes it easier to cut.
Ingredients: Makes about 15 salamis
6 metres of beef runners or beef middles
2.6 kg lean pork from the shoulder, minced on an 8mm plate
400g back fat, cut into 2mm dice
1-2 cloves of garlic, peeled and very finely chopped
Freshly ground black pepper, to taste
1-2 glasses of red wine
60g salt
Malt vinegar and olive oil, to finish
Before you get to work on your salami mix, put the beef runners to soak in a large bowl of fresh water. Slosh them about to rinse off the salt then leave them to soak overnight. When they are slippery, flexible and completely rinsed of salt, they are ready to use.
Mix together all the other ingredients (except the vinegar and oil) – with your bare (but clean) hands, if you like – so that the salt and fat are well distributed throughout the mix. Load up your sausage-making machine with the mix, slide a length of beef runner on to the nozzle, and tie the end of the casing into a knot, as you would tie a balloon. Then tie a short length of butcher’s string in an ordinary granny knot inside the knot. Make a loop with the string so you can hang the sausage up, and tie it again with a second knot in the same place. Stuff the casing with the mix until you have a filled a length of 40–50cm. As you work use a very sharp pin to prick the casing all over. This allows any air to escape and ensures you get a nice, tight salami. Cut off the runner, leaving enough unfilled runner at the end to tie another knot.
Hold up the filled casing with the knotted end at the bottom and squeeze the mixture down the casing gently, so it is nice and tight. Prick it again with the pin as you do this. Then tie another knot in the top of the runner and make another loop with string, just as you did at the other end. The compacted sausage, tied at both ends, will now be 30–40cm long, although you can make shorter ones if you like. It’s useful to have two people on the job for an efficient production line: one to do the filling and cutting, the other to do the knots and hang up the filled runners.
The salamis should be hung individually by the string loops in a cool, well-ventilated place where the temperature is not likely to rise above 12°C. Make sure they are not touching a wall, or each other, and they are not in direct sunlight. Over the coming weeks, a number of moulds, ranging in colour from grey-green to white and even orange, may form on the casings. None of these should worry you but you can wash them off with a cloth soaked in malt vinegar if you wish.
The salami may take anything from 4 to 10 weeks to mature, depending on the conditions and, indeed, on how you like them. They can be tried as soon as they are fairly firm to the touch and dry-looking, but they will continue to dry out and harden until they are practically rock hard. When they reach the stage you like, wipe off any mould from the outside with a cloth soaked in vinegar. Rub the salami with a little olive oil and transfer it to the fridge. Serve your salami in slices 2–3mm thick. If you prefer, peel off the ring of casing from each slice before eating, although it is perfectly safe to eat.
The rest of the day was a whirlwind of various cuts, techniques (inc. brining, dry rubbing hot & cold smoking) and flavours and textures. I’d be typing for another day or so to cover everything that Steve showed us. Suffice to say that you need to (a) buy his book (and he signed my copy, that I’d brought along that day, with a smile) or (b) book a day on his course. Or (c) — which is what I’d really recommend — both of these options.
He’s a hugely passionate, committed and interested tutor and I can’t praise him too highly or underplay just quite how much I enjoyed this day. I came away even more confident that charcuterie is what I love doing and also that there’s nothing to be scared of in either the techniques or in recipes given — just a case of practice, practice, practice and experiment, experiment, experiment. Think of your own additions to the the mixes and rubs and brines and see what they do. They may well work.
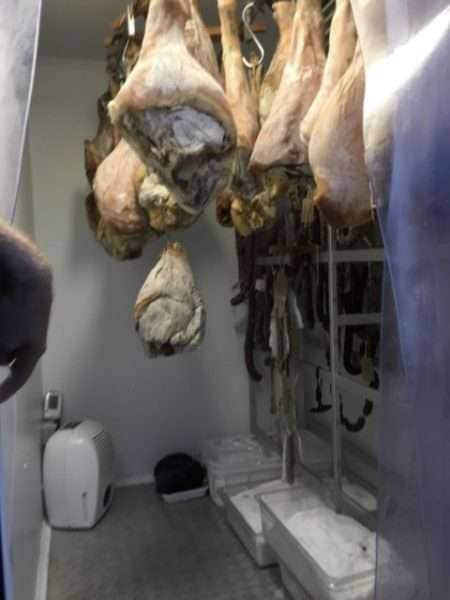
And finally? Finally, a shot from inside their temperature & humidity controlled hanging store. If this doesn’t have you drooling over the page and wanting to do your own charcuterie, then nothing will.
And finally, finally, a quick shout out to The Whole Hog in Lyme Regis for their dedication to producing just one thing, but that one thing extremely well; a hefty portion of pork pulled off the joint, accompanied by crackling, apple sauce, reduced onions & gravy inna white bun. Kudos guys. It’s great.
Me? I’m off to start work on a 12-month Prosciutto cure. Wish me luck.