Apropos of nothing here (although I did recently do a piece or two about congee here and here), I see that Lisa Lim of the South China Morning Post writes that the Western name, “congee,” is actually borrowed from “Tamil kanji (also the Telugu and Kannada gañji, the Malayalam kanni and the Urdu ganji), from kanjī (“boilings”), referring to the water in which the rice has been cooked.” Worth a few minutes of your time to read her article in full…
And with that nugget shared; let’s move on to the egg and skin? Here’s Lee Tiernan again, on visuals:
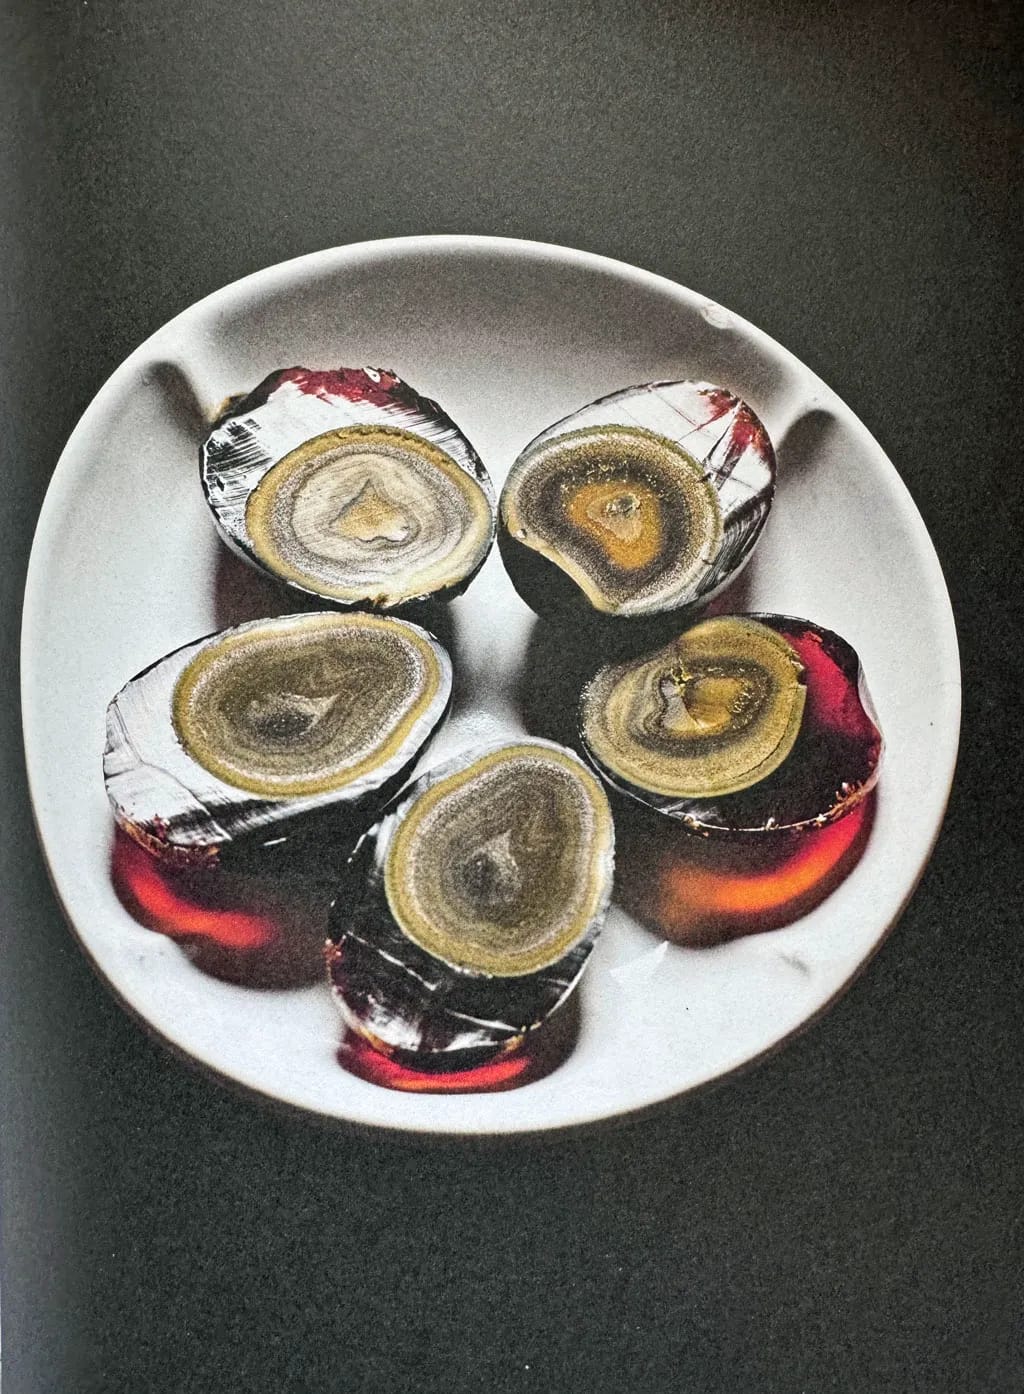
Have you ever eaten a century egg? There is a saying ‘the first bite is with the eye’. Let’s just say that putting something that looks akin to Fungus the Bogeyman’s* dissected scrotum into your mouth is pretty intimidating. I was fascinated and appalled in equal measure when I first saw one in a restaurant in London’s Chinatown. There is no way that can be good to eat, I remember thinking, and politely declined the offer to partake. I was intrigued though, and watched as the other diners at the table tucked into them with gusto.
[* for the USA-nians and others out there, for whom this name means nothing, it’s a reference to a children’s book character by Raymond Briggs, all the way back in 1977]

And then on taste:
It was years later when I ate my first century egg. It was a genuine leap of faith when I took my first bite… just a quarter to start with. I eyed up the grey/green yolk, which is the least appetising colour of anything edible that I can actually think of, closed my eyes and put it in my mouth expeciting it to taste how I imagined – disgusting and rank. I waited for my gag reflex to kick in, resulting in me puking my guts out instantaneously. But to my surprise and relief, it tasted nothing close to the flavour profile I had conjured up in my head. So trust me on this when I say that if you like eggs, you will like century eggs. They have a very intense eggy flavour, great texture and eat particularly well with anchovy, capers and mayo, or anything that complements eggs in general. We put century eggs on with anchovy mayonnaise during the first weeks of opening BAM. I’ll admit that intimidating diners held some appeal, but I also knew that like me, people would be pleasantly surprised if they gave them a go. I was encouraged by the number we sold – but that might’ve been due to the fact that we only had six items on the menu. I prefer to think it’s because people come to BAM to give new things a try.
I was reminded to dig out this recipe as I’d found a ½-a-dozen box of these hidden at the back of one of those “a road less travelled” shelves, in the pantry (you know that shelf, that missed item don’t you?).

Without further ado therefore — albeit after much copy-typing — here’s the full recipe (which serves 4), inc. all the side bits needed for <taaaadaaaa>:
CENTURY EGG WITH ANCHOVY DRESSING AND CRISPY PIG’S SKIN
2 century eggs
4 heaped tablespoons Anchovy Dressing (see below)
handful mustard cress
large handful Crispy Pig’s Skin (see below) seasoned with
only salt and pepper
dash of Lemon Oil (see below)
Fill a small saucepan with water, bring to the boil, and add the century eggs. Boil for 6 minutes. Remove from the heat and chill the eggs completely in iced water. Once cold, peel the eggs and cut each in half, cleaning the knife every time you cut through an egg. Put a spoonful of Anchovy Dressing on four shallow serving bowls and nestle half a century egg on top. Cut a tiny bouquet of mustard cress and pop it next to the egg. Lay some Crispy Pig’s Skin next to the egg. Drizzle the cress with a little Lemon Oil and serve.
On the pig skin (which serves 6-8 as snacks):
This method won’t produce puffy chicharron-style skin. Instead, this will give you a more traditional British pub-style pork scratching.
ESSENTIAL EQUIPMENT
food processor or spice grinder
deep-fat fryer
1 kg/22/4 Ib pig’s skin with a little fat (the larger the pieces the better) or 6 pig’s ears, or a mixture of both
vegetable oil, for deep frying
plain (all-purpose) four, for dusting
salt
FOR THE SEASONING
3 dried black limes, lightly crushed
65 g (21/2 oz/*/2 cup) chicken stock powder (bouillon]
½2 teaspoon caster (superfine) sugar
1/4 teaspoon cayenne pepper or chilli powder
Place all the ingredients for the seasoning in a spice grinder or food processor and blitz to a fine powder. Store in a dry place, in an airtight container. It will last for about 4 weeks. Place the skin in a large saucepan, cover with water and bring to the boil. Drain the skin, fill the pan once more with fresh water, season with salt and bring back to the boil. The seasoning is important. I generally get the water as salty as seawater. Bring the skin back to the boil one more time then reduce to a simmer. Cut a circle out of baking parchment) paper that fits snugly inside the saucepan (a cartouche) and place it on top of the skin. Weigh them down slightly with a plate or tray – if the skin is in any way poking out during the cooking, it’ll get tough and can’t be used, so make sure it’s nice and snug. If the pan has a lid, place it on top. If not a double layer of aluminium foil. The foil will actually work better as it allows little or no steam to escape, reducing the cooking time a little. Simmer for 2 hours. After this time, check the skin, but be careful of the steam build up when removing the foil or lid. Poke the skin with a skewer – if it goes in and out with the very slightest resistance, it’s done. You can leave it to cool in the cooking liquid and transfer when cold, but like to chill the skin as soon as possible by running under the cold tap until cool enough to handle. The skin will be quite delicate at this stage. Lift it out of the water and place skin-side down on a clean dish towel or cloth. Pat the fatty side of the skin with a towel until dry, and gently dry the ears, if using. Layer between squares of baking paper to prevent the pieces sticking together and refrigerate overnight, this makes them way easier to manage and portion, or for as long as you can before cooking.
Once chilled, it’s time to slice the skin. Place skin-side down on a chopping (cutting) board and slice as thinly as possible. If you are using ears, place with the tip pointing away from you and thinly slice vertically. Heat the oil in a deep-fat fryer to the maximum heat available. Lightly dust the skin slices with flour, then place small handfuls in the fryer basket and lower into the oil. Give the oil a minute to stop bubbling, then lift the meat out. They have a tendency to stick together, so use the tongs to separate the pieces and then lower into the oil once more. Repeat this again a minute or two later. I’m reluctant to give you an exact cooking time as each of you will be using a different capacity fryer that will perhaps have a different maximum temperature or recovery time. I would shoot for 6-8 minutes, checking and separating every couple of minutes. The skin can look done before it’s actually achieved its maximum crunch.
When you think the skin is done, take a piece out, place on the towel, allow to cool a bit then take a nibble. They should have a satisfying snap and crunch quality. If they’re chewy then they’ll need more time in the fryer. Repeat until all the pieces are cooked. Drain on paper towels and allow to cool. In a big bowl, toss the pig pieces with a generous smattering of the seasoning. I love how the skin looks all heaped up in a bowl. Best served with beers and tequila.
ANCHOVY DRESSING — MAKES 120 ML (4½ FL OZ/½ CUP)
ESSENTIAL EQUIPMENT
hand-held (immersion) blender
1 clove garlic
1 x 50 g (2 oz) can of the best quality anchovies you can find, chilled
1/ tablespoons rapeseed oil
juice of ½ lemon, plus extra to taste
Grate the garlic into a small bowl or the cup attachment of your hand-held (immersion) blender. Add the chilled anchovies with a little of the oil from the can and blitz until smooth. Emulsify the oil into the anchovies in one gentle, constant, steady stream. If you add it too fast you run the risk of splitting the dressing. Add 2 tablespoons water and the lemon juice and whizz once more on a lower setting just to incorporate. Taste again. Feel free to give it another squeeze of lemon if you like it zesty. When you’re happy with the acidity, decant into an airtight container or squeeze bottle and chill until needed. It will keep for up to 5 days.
LEMON OIL MAKES 500 ML (17 FL OZ/GENEROUS 2 CUPS)
100 ml (3½2 f oz/scant ½ cup) lemon juice
400 ml (14 fl oz/1⅔ cups) good quality light olive oil
Mix the juice & oil together in a bottle. Shake well before applying. This will work as a light, stand-alone dressing in addition to lubricating dishes. Store in the refrigerator for up to a week.